Painting Nemo Miniatures #2518 Swamp Dragon Reptaar
Painting Nemo Miniatures #2518 Swamp Dragon Reptaar |
| |
|
Wegen großer Nachfrage habe ich in diesem
Bericht mal niedergeschrieben, wie ich Nemo-Miniature's Neuauflage
des alten "Drache des Monats" Sumpf
Drache bemalt habe. Lass Dich von der Natur inspirieren Bevor ich damit anfing, die Miniatur zu
bemalen, musste ich mich erstmal entscheiden, welche Farben ich verwenden
würde. Um das beste aus einer Miniatur zu machen, sollte man sich immer
erst klar darüber sein, was man erreichen möchte. Die Vorbereitung des Drachen Nach dem Entfernen der Gussgrate und dem
Zusammenbau des Drachen mit 2-Komponenten-Epoxid-Kleber, habe ich den
Drachen mit etwas Heisskleber auf einer kleine Plastikdose befestigt,
damit ich ihn bem Bemalen besser handhaben kann. Auf diese Weise kann
ich verhindern, den Drachen zu berühren, bevor er fertig und mit Klarlack
vesiegelt ist. Ich kann einen guten Haltegriff nur immer wieder empfehlen,
wenn man ein Figur bemalt. Die Bemalung des Drachen Der nächste Schritt nach dem die Grundieren
war das Auftragen der erste Grundfarbe. Hierzu bemalte ich die ganze Figur
mit einer dünnen Schicht Elfenbein. Diese Schicht darf man aber auch nicht
zu dünn machen, sie sollte die Miniatur so gut bedecken, dass an hervorstehenden
Stellen immernoch ein Hauch der weissen Grundierung durchschimmert und
damit die Highlights schonmal ein wenig vormarkiert werden. Die Beschaffenheit eines Wash Nachdem diese Grundfarbschicht getrocknet
war, habe ich den Drachen mit einer verdünnten Schicht hellem Gelbocker
lasiert. Der erste Hauch eines Schattens Dies ist der erste Schritt um die Vertiefungen
der Drachenhaut abzudunkeln. Der helle Gelbocker verdeckt das Elfenbein
nicht allzusehr und lässt eine schon erahnen, wo später, beim "Washing"
mit den dunkleren Farben die Schatten sein werden. Mit dieser "Wash"-Technik
male ich in der Regel alle mein Modelle an, um weiche Übergänge zwischen
verschiedenen Farben oder zwischen Glanzlichtern und Schatten zu erzielen.
Es handelt sich hierbei also immer um Nass-auf-Trocken-Bemalung. Das bedeutet,
dass die Unten liegend immer erst gut getrocknet sein muss, bevor ich
die nächste Farbschicht auflasiere. Tiefer in die Schatten Dem erste "Wash" mit hellem Gelbocker folgte
dann ein zweiter (nach dem Trocknen natürlich!) mit ganz normalem Gelbocker.
Diesen "Wash" verteilte ich aber jetzt nicht mehr über die gesammte Figur,
sondern fing an, die Farbe gezielter in die Vertiefungen einzubringen.
Wie z.B. unter den Armen, zwischen den Beinen, unter dem Unterkiefer und
an änlichen Stellen. Jetzt sah der Drache schon ein wenig wie ein Albino
aus (Hmm, interessante Idee, nächstes Mal vielleicht). Der nächste "Wash"
bestand aus einem hellen Braun, welches ich auf die Handflächen der Klauen,
und an den Seiten des Nacken aufbrachte, dort wo im weiteren Verlauf das
Farbschema in die hellere Unterseite und die dunklere, grüne Oberseite
aufgeteilt werden würde. Auf diese Weise definierte ich schonmal einen
Kontrast zwischen der Ober- und der Unterseite vor. Genauso verfuhr ich
mit den Seiten des Bauches und des Schwanzes. Per Drybrush wieder ein paar Glanzlichter hinzufügen Nachdem dieser "Wash" getrocknet war, habe
ich mit sanftem "Drybrushing" die Unterseite des Drachen nochmal mit dem
ursprünglichen Elfenbein bemalt. Dieses "Drybrushing" hellt den zuvor
von den Wasches etwas abgedunkelten Bauch wieder auf und hebt die Schuppen
wieder mehr hervor. Es ist wichtig, besser 2-3 mal ganz leicht zu drybrushen
mit einem fast ganz trocknen Pinsel, als einmal mit zu viel Farbe. Auf
diese Weise baut sich die Farbschicht langsam und gezielt dort auf wo
sie hin soll. Wenn man nur einmal mit zu viel Farbe drybrushed, wird der
Effekt sehr kreidig und staubig und die einzelnen Pinselstriche werden
zu sichtbar. Weniger ist hier mehr! Abschliessend lasierte ich dann noch
einen etwas rotbraunen "Wash" über die schon abgedunkelten Bereiche. Drachen
müssen eine Art Blut in ihren Adern haben, und so ist es nur natürlich,
dass die Haut in den Falten und Vertiefungen einen leichten Rotschimmer
hat. Kreieren des "Aligator"-Looks Jetzt kam die Oberseite des Körpers dran. Ich wollte, dass sie grün aussieht, wie auf dem Bild des Krokodiels, welches ich als Vorlage gewählt hatte. Auch hier verwendete ich mehrer Schichtne "gewashter" grüner Farbe. Ich began also mit einem sehr hellen, blassen Grün um der elfenbeinfarbenen Haut eine grünen Grundton zu verpassen. Ich habe dabei versucht, die Ränder der Schuppen so hell wie möglich zulassen, indem ich die grüne Farbe wieder von ihnen abwischte. Ich habe dann ein grünen "Wash" über die Seiten des Drachen lasiert, dort wo der elfenbein-ockerfarbene Bauch in den grünen Rücken übergeht. Durch die Verwendung von sehr dünnen "Washes" wurde der Übergang sehr weich und natürlich. Ich machte dann mit dunkleren grünen "Washes" auf dem Rücken weiter. Mit einem feuchten Pinsel habe ich dann die Ränder der Schuppen, die Augenbrauen und die Nasenflügel wieder von dem Grün befreit, so dass diese Stellen in der elfenbeinockerfarbenen Grundfarbe hervorstanden. Genauso habe ich dann die Oberseiten der Arme und Beine mit diesem Grün "gewashed", damit sie genauso aussahen, wie die restliche Oberseite des Drachen. Die Klauen und die Hörner auf dem Rücken wurden mit eine paar Schichten Farbe, reichend von Gelbocker an den Spitzen zu dunklem Braun an den Sockeln, "gewashed". Auf diese Weise blieben die Spitzen der Klauen und Hörner elfenbeinfarbend und gingen dann ganz weich zu dunklem Braun an den Sockeln über. Das stellt einen schönen Kontrast zu der umgebenden elfenbeinfarbenen und grünen Haut dar. |
Well, on great demand I wrote down
this tutorial about how I painted Nemo-Miniature's rerelease
of Grenadier's old "Dragons of the Month"
Swamp
Dragon. Take nature as an inspiration Before I started painting the
miniature I had to decide what colors to use. To make the best of a
miniature, it is allways important to get a clear idea of what you
want to archive first.
Preparing the Dragon After cleaning the moldlines and
glueing the Dragon together with two part epoxy I attached it onto a
small plastic box with some hot glue. This box acts as a handle and
with it I can handle the miniature better while painting it. I can
avoid to touch the dragon until it is finished and sealed with clear
laquer. I really recommend a good handle whenever you paint a
miniature.
Painting the Dragon The next step was the base color. I painted the entire miniature with a thin coat of light ivory. Don't make this layer too thin, it should cover the miniature good enough so that a touch of the white primer can shine through in the raised areas and mark the highlights.
The consistency of a wash After this basic layer had dried, I
washed the dragon with a thinned down light yellow ocher.
An idea of Shadows This is the first step to darken down
the deeper areas of the Dragon's skin. The light yellow ochre
covers the ivory not to heavy and gives you an idea of where the
shadow will be positioned later during the heavyer washes with darker
paints. This washing technique is basically what I do with all of my
minis to archives very smooth transitions between different colors or
from highlights to shadows. It is always wet on dry painting. This
means that the underlying paint must be dry before you wash on the
next layer.
Deeper into the Shadows This first wash with light yellow ocher was followed by a second wash (after the first has dried, of course) with standard yellow ocher. At this point I didn't wash it over th entire miniature but started to aim the wash more into the deeper areas. Like under the arms, between the legs, under the lower jaw and so on. Well, now the dragon looked a bit like an albino (hmm, nice idea, maybe next time). The next wash was a light brown which I applied to the palms of the claws and down the sides of the neck where the colors will be divided into the lighter underbelly and the green upper side. This way I predefined a contrast between the upper and lower side. I did the same on the sides of the belly and down the sides of the tale. The same brown wash also went onto the chest between the shoulders and the underside of the skin connecting the upper right arm with the shoulder. The other arm is tight-fitting to the body so that the skin there is folded. A brown wash goes into that fold also. It is a deep shadowed area. The mace-like tip of the tail was also washed brown. I repeated this step with a deeper brown, taking care that the mixture was very thin and translucent, so that the overall color doesn't get too dark. The darker colors must only be applied into the deepest areas.
Add a little drybrushed highlight After the wash had dried, I softly drybrushed the Dragon's underside with the basic ivory color I started with. This drybrush lightens up and defines the scales, that have become darker throughout the washing. I is important to drybrush two or three times with an almost dry brush. This way the paint will slowly build up where it is supposed to. If you brush only one time with too much paint on the brush, the effect will be very chalky and the brush strokes will become visible. Less is better here! Finally I applied another thin wash of a more reddish brown to the already darkened areas. The dragon must have some kind of blood in his veins and so naturally the skin becomes more reddish in the folds and wrinkles.
Creating that "gator" look Now for the upper part of the body. I wanted this to look green, like on the picture of the Crocodile I choose for reference. Again I used several "washed" layers of water-thinned green paint. I started with a very light green to give the ivory looking skin on the back a basically green look. I tried to leave the edges of the scales as light as possible by washing the green paint from them. I ran a wash with the green paint down the sides of the dragon where the ivory-ocher underbelly merges into the green back of the dragon. By using a very thin wash of green the transition from ivory to green becomes very soft and natural. I proceeded with darker washes of green paint on the back. I used a damp brush to wipe the edges of the scales and the eyebrows and nostrils clean of the green paint, so that they stand out in the basic ivory-ocher color. I also washed the up sides of the arms and legs this way to match them with the rest of the Dragon´s upper side. The claws and horns on the back where washed with a few layers ranging from yellow ocher on the tip to darkest brown around the base. This way the tip of the claw/horn stays ivory and the base becomes dark-brown and a good contrast to the surrounding green and ivory skin is archived.
|
||
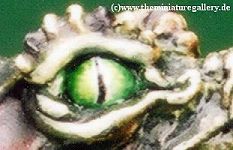
Und nun zu den Details. |
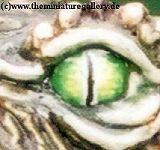 |
And now for the details. I basecoated the eyes with a light lemon-yellow. Then I applied a few washes from light to dark green around the edges to darken and blend the eyes into the sockets.Onto the yellow center I painted a vertical line for the reptile pupil and edged it out with lines of the light yellow I started with. Then I surrounded the pupil with a few tiny light yellow spots. The cheeks just behind the eyes where washed with a red brown, a bit like on a red-eared slider turtle trachemys scripta eleganssome. The long frog like tongue and the gum was basecoated with a light pink. Then I washed it down to the throat with several reds to a very dark red. To enhance the highlight the tip of the tongue was given a blending with white. Thinned down a bit so that the pink still shined through and the tip didn´t became too white. For the spots I used a dark brown which I applied thinned down to various scales randomly. Then I highlighted these spots softly with a mid brown. The eyes and tongue where covered with a layer of gloss varnish for the organic wet look.
|
|
 |
|||
Der Sumpf und der ganze Rest The tree stump, the dragon clings to
in his dramatic pose, was based with a light flesh color and then
washed down with several brown colors from light to dark. For the
rotting look I finally washed it with some dark green. Then I
drybrushed the whole tree with some very light brown. Again, better
three times very soft then once too much. I only wanted to lighten up
the edges of the wood structure a bit. After all, this tree was
supposed to come right out of the greenish water of a rotten swamp
pond. I sealed the paintjob with a couple layers of matte varnish.
Fazit Painting this dragon was pure fun. The
only small flaw I encountered was the throat that was, due to a worn
out mould, not deep enough. So I had to drill it out with my dremel to
provide a proper socket for the tongue. Besides this, the model is
still very attractive, even after all those years and well worth it´s
price. Dirk Stiller |
The swamp and the rest The tree stump, the dragon clings to
in his dramatic pose, was based with a light flesh color and then
washed down with several brown colors from light to dark. For the
rotting look I finally washed it with some dark green. Then I
drybrushed the whole tree with some very light brown. Again, better
three times very soft then once too much. I only wanted to lighten up
the edges of the wood structure a bit. After all, this tree was
supposed to come right out of the greenish water of a rotten swamp
pond. I sealed the paintjob with a couple layers of matte varnish.
Conclusion Painting this dragon was pure fun. The
only small flaw I encountered was the throat that was, due to a worn
out mould, not deep enough. So I had to drill it out with my dremel to
provide a proper socket for the tongue. Besides this, the model is
still very attractive, even after all those years and well worth it´s
price. Dirk Stiller |
||